Keep Your Car Clean!

I’ve introduced a new fabric into my shop, Palace Designs. I’ve been using my own Auto Litter Bag in my car for about a year and it comes in really handy. We’re all guilty of having  some form of trash and/or recycling rolling around our cars at some point. Tissues, wrappers, cups, bottles, gum wrappers, etc. can pile up in a hurry! This keeps it out of the seats, off of the floor, and out of door pockets. I empty the trash/recycling every day into the containers on our carport.

I’ve added this new “Go Green” print and below is an example of a finished product. Terribly sorry for the grainy photos! I will be so glad to have my camera back!

New "Go Green" print

If it gets dirty, you just toss these in the washing machine. You could use them as a wetbag in a pinch, but they are not waterproof. I can add snaps to them as well.

This is just one of my efforts to Go Green this year and to encourage others  as well. You can check out all the prints and patterns at my shop here, and Right now you can get 20% off your orders with code: GOGREEN.

If you’re a fan on Facebook, there’s an even better code listed. 🙂

 _______________________________________________

I loop mine around my drive shaft in the center of the car. Use this with caution. You never want to hang your bag where it can hinder your driving ability.

Hot Deal at Reuseit.com

Free Shipping with code THANKS50 + Free Order Sweepstakes. Through 11.29

30 Minute Slippers

I can’t take credit for this tutorial at all, but it’s too cute not to share! Alisa Burke shared this tutorial with everyone here on her blog. Personally I think hers are to-die-for, but I lack the patience to put as much effort as she did into her beautiful slippers!

These easy slippers took 30 minutes and only some felt and minky fabric that I had in my sewing cabinet!

As you can see by the blur of toes and blue pjs, I had a little help making these. 🙂

I traced my existing slipper onto felt.

I started by tracing my existing slipper onto some felt. For some reason, months ago I thought it was a good idea to purchase 2 yards of pink felt. (Probably because it was on sale.) I had no clear objective in mind for this, but somehow I must’ve known there would be a fabulous tutorial in my future. I also had some left over girly minky from a tag toy that I made B after he was born.

Minky layers on top of felt.

I cut the tops to be slightly larger than the bottoms, by tracing wider around the bottoms. I cut out whimsical hearts and used some felt ribbon to the trim them.

The Tops

These are nothing fancy and obviously homemade. As you can see by Alisa’s tutorial, you can really make these beautiful!

The end result of these is pretty cute. They are really warm and very soft. They can also be easily tossed in the washing machine for cleaning! Consider making some of these as gifts! I think they would make a fabulous Christmas present!

For me, these were eco-friendly. I used only materials that I already had. I realize not everyone has a sewing room with lots of fabric, but if you were to purchase to make these, you wouldn’t spend a lot! Felt sheets are on average 29 cents per sheet. You’d need 2 sheets for the bottom and one for the tops. One quarter of a yard would be plenty in your choice of fleece or minky fabric. You could cut up old sweatpants even! Be creative!

Happy sewing! I am off to finish Christmas pillowcases!

Again, this tutorial is NOT my own. Please view Alisa Burke’s original work here for your own inspiration!

Calling all Eco-Enthusiasts and Readers!

Journey to "Green"

I don’t always have the time to write the quality posts that I want to write or complete the numerous eco-friendly projects I have lying around the house and home improvement has come to a halt with the holidays here and money at a shortage. I want to keep the mix for you guys so that  it’s not the same reviews and product ideas all the time. I realize I’m not the only one with ideas on how to be eco-friendly and frugal so here’s where you all come in…

If you want a place to share your knowledge, Journey to “Green” is open to YOU!

Share your knowledge, crafts, WAHM products, eco-friendly upgrades, and so on with thousands of readers!

Some ideas of what you can submit:

  • A photo of your cloth diapered cutie
  • A DIY craft that’s eco-friendly (pictures, tutorials, links, etc.)
  • A tutorial on a personal beauty product that’s green (i.e. shampoo, deodorant, etc.)
  • See a great coupon? Let us know! Have a link for a related site? Share that too!
  • A recipe
  • A WAHM advertisement. If you make cloth diapers, upcycled clothing, mama cloth, etc., feel free to email me! I’ll be glad to help you advertise. I can post pictures of your latest products and advertise specials.
  • An eco-friendly art project
  • An eco-friendly home improvement project or upgrade! (i.e. a picture of that shiny new kitchen with Energy Star appliances, etc.)
  • Do you have a trash to treasure before and after!?! Let’s see it! Who doesn’t love a trash to treasure find? I do! I love seeing your projects as well!
  • Did you score an amazing deal while shopping today? Show us the goods and tell us how you did it!
  • Any ideas for living Green and Frugal are welcome! Feel free to send me whatever!
  • 

Will [you] receive credit for work published?

Yes! You will receive credit for that which you submit and/or write! I will link to your site, business, blog, or whatever. You will be named as the contributor unless you wish to remain anonymous. The idea is to help you out! I love hearing your suggestions and ideas and chances are that readers will as well! If I can help promote your creativity, products, or site(s), I am glad!

How to submit?

Send me an email at: palaciosamantha@yahoo.com with your stories, photos, coupons, links, businesses, projects, crafts, etc.

What to submit:

  • A way to contact you if I have questions
  • Applicable pictures
  • Links to reference
  • A full name (unless anonymous)
  • Your story, directions, explanation, how-to, etc.
  • Any other pertinent information

I  look forward to hearing from you ALL!

DIY Christmas Ornaments

I store our Christmas ornaments in one of those divided ornament protecting boxes. It turns out it will protect them as long as they don’t fall from a tower of boxes five feet off the ground. Eek! Sooo… I broke the majority of our glass ornaments shortly before we moved when they fell off a tower of storage boxes. Now I’ve got to make some ornaments!

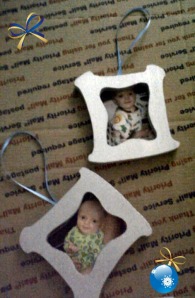
I found these whimsical wooden “frames” at Michael’s ages ago on clearance. I had no idea what I’d do with them at the time but they were around 30 cents each so I couldn’t resist. Using some recycled ribbon from my baby shower and some photos of my favorite guy, I turned these frames into cute ornaments in just minutes.

These were plain wood. I painted them Silver.

Sorry for the grainy pictures. I miss my camera. 😦

I used my heavy duty stapler to staple the photos to the back. Easy Peasy!

I think these turned out pretty darn cute! An idea like this would make great gift tags as well! Personalize presents by making ornaments to use as tags instead of purchasing those sticker labels and such!

all crafts Handmade Projects ~ Tip Me Tuesday

Last Minute Thanksgiving Decor

Thanksgiving Crafts eBookCheck out this FREE E-Book with 30 DIY Thanksgiving crafts from Fave Crafts. Print it out or print only the crafts you want to try. Several can be accomplished using supplies you already have!

Redesign some of those boring white dishes with some glass paint and creativity! If you don’t have any, think about picking up some inexpensive ones at a yard sale. You could create some as beautiful as these:

Leaves Detail

Use toilet paper/paper towel rolls and felt to create cute napkin rings like these:

Easy Thanksgiving Napkin Rings

Use old holiday cards to create a collage with the kids. (Christmas or Thanksgiving) Glue them onto poster board and cut to place mat size. Laminate, and you have your own custom, festive holiday placemats! Think about using photos, decopauge papers, and recycled mail as well!

Disney Family Fun has DIY crafts and printables.  I love these doilies:

Turkey Place Cards for Thanksgiving

And these adorable turkey chair covers:

Turkey Chair Covers

Laurie at Tip Junkie has also compiled 16 frugal ideas for you here.


Homemade Deodorant Revamped

After a suggestion (Thanks Monique!) that I try coconut oil in my homemade deodorant recipe, I started mixing it up today.

INGREDIENTS:

2 1/2 tbsp of Spectrum Organic Coconut Oil (The Virgin Coconut oil is what smells like yummy coconuts. This one doesn’t smell.)

2 tbsp cornstarch

1/2 tbsp baking soda

5 drops vitamin E (for moisturizing purposes)

3 drops essential oil (for smell)

I heated my coconut oil in the microwave because the liquid is easier to mix than the solid. I combined the ingredients in a pyrex measurement cup and stirred it well until blended.

Use your finger to apply.

As the coconut oil dries, it becomes thick and solid. I added Aura Cacia essential oil to my deodorant because it is my favorite. Baby food jars/containers are the perfect container to reuse for this as well. I have to admit that I like this recipe MUCH better than my former petro jelly version! It’s cheaper than buying store bought deodorant as I can make about 7 containers with just 1 jar of coconut oil!

This would make a great homemade Christmas gift!

Please respect that this recipe is intended for personal use and not for sale.

DIY Toilet Bowl Cleaner

Vinegar is the obvious choice for a DIY natural toilet bowl cleaner, but I personally can’t stand heavy doses of straight vinegar. Not to mention, I prefer a little more suds in my “clean.” To make your own toilet bowl cleaner, feel free to follow my recipe below:

1/8 cup castile soap. I use Dr. Bronner’s.

1/2 cup vinegar

1 cup water

-optional-

Add 10 drops of tea tree oil for antibacterial purposes. I like this for spraying the toilet seats themselves.

You could also substitute castile soap with a bar of soap to cut down on cost or use what you have. If you’re using a bar of soap, you’ll want some type of grater dedicated to shaving soap. You’ll only need 1/4 of the soap bar for this as well.

This will yield enough to fill a small bottle. Add to a recycled spray bottle for really easy cleaning.

_____________________________

I apologize for the lack of pictures! My camera broke today and has been sent off for repair. I hope to be up and running soon!

Wipes Solution

Lately I’ve been using Honey Bun Drops by Chubby Cherubs, LLC because I had them on hand. Of the many different scents and ingredients that she carries, I like the Milk and Honey best. They do work well and smell really well. They cost $10 for a 5 oz. bag and with shipping will run $15.  

When I’m not so lucky to receive a product like this, I make my own wipes solution! My first DIY wipes solution consisted of:

1/2 cup of water

3-4 drops of tea tree oil

3 drops vitamin E

NOW ADDED:

4 drops of Dr. Bronner’s Castile Soap

I’ve found that over time I like to add some Dr. Bronner’s to this as well. There’s an extra added clean feeling to it if you add a little squirt of castile soap!

Homemade Natural Laundry Detergent

Today is the day I replenishing my laundry soap and working on some homemade stuff. Get your pencils ready for some recipes!

There is never a shortage of recycled bottles in this house because my husband (the non-environmentalist) is a soda-only drinker. Yes, we are two opposites. I personally love these little bottles from Gerber’s Organic Apple juice. They’re small and perfect for travel. They are easily stored and house 3 laundry loads each.

Combine:

1  cup water
2 oz. Dr. Bronner’s Castile Soap
1 cup baking soda
1/4 cup vinegar

Mix well and pour into desired recycled container.


The concoction looks like this:

Be sure to shake up your container before each use.

Not only is this inexpensive, but a little goes a long way. The more water you add to your recipe, the longer it will stretch. You can also use less castile soap if you’d like. We typically have a lot of staining so I use more.

Dr. Bronner’s also has different scents. I use lavender so we have a hint of lavender scent in the wash.

Enjoy!